This assessment is by Homebrew Finds Contributor Brad Probert. Brad is an engineer, skilled homebrewer and skilled reviewer. Seize a hyperlink to Brad’s web site on the finish of this assessment.
Kegland Cannular Can Seamer
It’s been a protracted street for craft beer to be accepted in cans and never bottles. Nevertheless it has been effectively established that cans are OK, too, and a few take it even additional to tout cans as a superior storage vessel for beer. I’ll keep away from a full-blown comparability of the professionals & cons of every, however I do really feel it price noting a few the promoting factors cans have. One is the declare that cans present higher storage with a extra oxygen-proof seal than bottle caps, and 100% gentle blocking versus even brown coloured glass. There’s in all probability numerous debate on these two matters, however one profit that’s universally acknowledged is transportability. Cans are lighter and extra compact, a complete lot much less fragile, and you’ll take them to seashores and swimming pools the place glass containers are banned.
On the homebrew scale, till just lately, the canners out there have both been hand-crank monstrosities that appear like an exhibit from a museum on the economic revolution, or electrically pushed models that appear like steampunk film props and value a pair thousand {dollars}. Then in 2019, KegLand from Australia began exporting their Cannular can seamer that sells for $525 for the unit + energy provide and is electrically powered. This modified the panorama considerably within the homebrew world, making canning rather more inside attain.
Restricted Time Deal… FREE Cans:

MoreBeer is throwing in a free case of cans whenever you purchase a Cannular or Cannular Professional. This can be a $149.99 worth. Cannular associated offers are uncommon so it is a likelihood to avoid wasting.
Purchase a Cannular get a FREE Case of Cans & Lids!
Examine Costs, Evaluate Continues Beneath:
Empty Can

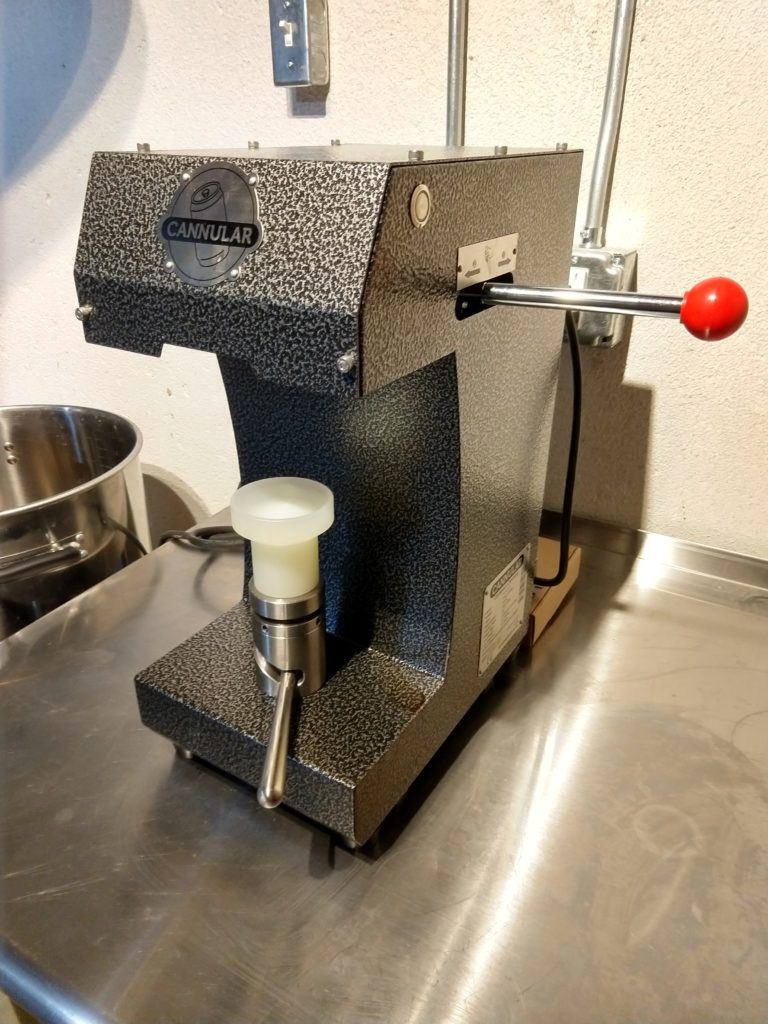
The Cannular operates with a mixture of guide lever pulling and electrical motor spinning. You begin the method out with an empty aluminum can with no high on it. You sanitize the can, fill it with beer, after which take a sanitized lid and set it down on high of the can (ideally on foam, to make sure minimization of air in your canned product). From there, it will get positioned on a small pedestal and a lever flip raises the can up into the equipment of the can seaming operation and locks it at that top. The push of a button will get the motor spinning and the can on its platform begins spinning round. Grabbing a special lever, you push again and maintain it for a pair seconds, then pull it towards you for a pair seconds, and also you’re completed. Flip off the motor, decrease your can again down on the pedestal, and also you’ve canned one beer.


The canner is about as much as work with 202 finish diameter beer cans with B64 lids. Apparently there are differing kinds, and with some changes you will get the Cannular to work with another can sizes. The unit comes with a base pedestal sized for 500 ml (16 oz) cans, however you can even get an adapter that raises it up a bit after which you should use 330 ml (12 oz) cans. Empty cans/lids of each these sizes can be found at MoreBeer, together with the 12 oz can adapter, and naturally the Cannular itself. From the manufacturing unit, KegLand says the machine is sweet for about 100,000 cans earlier than it’ll want adjustment of the rollers. These might be accessed by some set screws within the high portion of the machine.
Palms on Evaluate
The development of the unit was stable and durable. The properly machined pedestal base was constructed from chrome steel, so it ought to stand the check of time, working in a moist atmosphere. The various physique of the unit was constructed from a hammered end metal, making it enticing and sturdy. Importantly, all the sides have been properly designed so there have been no finger-splitting sharp edges to be shocked by. The plastic adapters that the cans sit on (I had each the 330 ml and 500 ml measurement) have been properly balanced, however the materials appeared like I ought to in all probability take care to not drop these too many instances. The 24V energy provide had a pleasant, sturdy, machined housing. The size of wiring from the ability provide as much as the connector on the unit was about an inch too quick, so because of this I needed to set it on one thing (the field it got here in labored) to keep away from the burden pulling on and straining the wire terminals. KegLand mentioned that primarily based on early suggestions, that they had already lengthened this, so new models have loads of size.

Regardless that I used to be utilizing the cans that the unit is manufacturing unit set to, I made a decision I’d nonetheless observe the set-up information from the KegLand web site. After grinding open some test-seamed cans and making an attempt to differentiate overlap, I discovered I used to be means above the minimal specification, that means a superb sturdy seal. So I might advocate skipping this step in case you’re utilizing the required cans and simply do some apply runs with water. My first cans I broken fairly a bit, wrinkling the aspect partitions like a crumpled newspaper. I discovered this was resulting from me making use of an excessive amount of power to the guide lever up high when pushing it again and pulling it ahead for the 2 crimping steps of the method. So it solely took me about 4 trial cans till I acquired the knack for the appropriate degree of strain to use on the lever in order to not wrinkle the cans.
I then moved on to the actual deal, carbonated beer from a keg. I had a small bucket stuffed with Star San resolution, and I dipped the cans in it earlier than filling, and the lids earlier than inserting them on high. KegLand recommends utilizing a bottle filler, so I used my Blichmann beer gun to fill the cans. Identical course of as bottling- blasting the underside with CO2 first, then filling, and inserting the highest on foam. Doing this meant foam operating down the perimeters because the lid was positioned on, which then meant a Beer Sprinkler once I turned on the unit and the can began spinning, flinging beer foam in all instructions. This was much less dramatic once I wiped down the skin of the can earlier than spinning. However be ready to have moist beer round and plan accordingly, ensuring all the things in a spinning radius might be simply cleaned up afterward. Cleanup was actually fairly simple, with a moist rag and a sprig bottle to clean down issues and wipe them off. The supplies of the Cannular made cleanup very simple.
As excited as I used to be to do this out, I needed to remind myself that since I’ve moved from bottling to kegging, I haven’t bottled something in a very long time. So whereas making an attempt out canning, I additionally bottled some once more to see if there was a course of profit to canning versus bottling. The bottles additionally turned out to be a helpful comparator since most of my “canning points” have been actually might extra precisely be referred to as “beer gun points”. However from a filling course of standpoint, there’s actually no distinction in time or issue between bottling a beer and canning a beer.
Dialing Within the Cannular
It took me 3 trials to get it honed in. In my first trial, I had a variety of foaming issues- each in cans and bottles. Primarily based on stuffed weights, I acquired 8 – 10 oz in my cans and bottles. However I used to be filling from the beer gun with CO2 set to 10 psi, and afterward I remembered the Blichmann troubleshooting information urged 5 psi.
My second trial, I used 5 psi, and had much less foaming issues. It took about 20-30 seconds per can to fill. I used to be getting 10.5 – 11.5 oz in cans and bottles with this trial. Though I acquired a superb hiss when popping the tab open, there was little to no carbonation within the glass shortly after pouring it.
For the third trial, KegLand had urged I chill my beer first to sub-freezing temperatures and concentrate on conserving issues chilly. So I turned my keezer down from its traditional 35F to 30F for twenty-four hours previous to filling time. I additionally put the beer gun and its size of liquid line inside a chilly fridge for a similar period of time. When pulling the keg out to make use of, I put it inside my Cool Brewing insulated keg bag with a flat ice pack slid down within the bag to maintain issues chilly. Shelling out by way of the beer gun at 5 psi once more, this time I had little or no foam within the can whereas filling. The fill quantity turned out even higher, getting 11.5 – 12 oz within the cans/bottles.


When opening these 24 hours later, I used to be happy after popping it open, I had a superb regular stream of carbonation bubbles going effectively after pouring it into my glass. I then went and stuffed a glass out of the faucet from my keezer and located it had much less carbonation bubbles even than the can. Though this made sense from the truth that beer carbonated at 30F @ 10 psi has 12% greater volumes of CO2 than the identical beer carbonated at 35F @ 10 psi, it was nonetheless stunning. The comparability additionally jogged my memory that draft beer isn’t foolproof, as I famous not solely the carbonation variations, however the telltale haze of unclean beer strains. A spot verify on beer 16 days after canning confirmed it nonetheless held good carbonation. The bottle this time had barely higher carbonation, however as you’ll be able to see from the image it additionally had barely extra beer. Once more reconfirming it’s all about how effectively you get it stuffed earlier than sealing it.
Conclusions
The canning course of itself was simple, one way or the other feeling smoother than bottling, despite the fact that they each took the identical period of time. And thru my trials, I discovered that whether or not I used to be filling a bottle or a can, I used to be capable of get about the identical quantity of beer in both. So actually the important thing to profitable canning is profitable beer switch into the can when canning. There’s a substantial funding to get into canning. However in case you can afford it, and canning your beer will permit you extra/simpler methods of taking your beer with you, I believe the Cannular gained’t disappoint.
Examine Costs:
Consumer Guide
Kegland’s Cannular Setup and Adjustment Information
Get a Deal on Cans!

Examine: Cannular vs Oktober Designs SL1
Palms on Evaluate: Oktober Design SL1 Can Seamer – Can Your Homebrew!
Tapcooler Counter Stress Filler

Extra Photographs


Extra Kegland Gear Evaluations!

Extra Homebrew Finds!

By Brad Probert. Take a look at Brad’s web site – beersnobby.com
Particular Because of Kegland for offering the unit used for analysis on this assessment.
Worth, promotions and availability can change rapidly. Test the product web page for present worth, description and availability.
Be certain the elements you utilize are appropriate and rated to your supposed software. Contact producer with questions on suitability or a selected software. All the time learn and observe producer instructions. assessment:cannular rs:7 tag:tpr
