
A how-to from the American Homebrewer’s Affiliation
Deal on AHA Membership:
The advantages of AHA membership are quite a few and invaluable. In case you’re not a member of the American Homebrewer’s Affiliation, I believe it’s best to think about becoming a member of.
Get $5 off AHA memberships if you use coupon code HBF. Applies to new and renewed memberships and print or digital.
$5 Off AHA Membership! – keep in mind promo code HBF
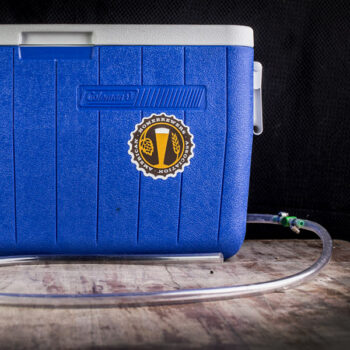
This walks you thru placing collectively a Cooler Mash Tun Construct based mostly on this 48 Quart Coleman Cooler.
This setup is predicated on Denny Conn’s nice design. Denny is a legendary homebrewer. Amongst different issues, he’s the co-author of Experimental Homebrewing and the keeper of Wyeast 1450 Denny’s Favourite 50. Try Denny’s Creator Web page on Amazon see extra of his books.
Associated:
Methods to Construct a Mash Tun – by way of the American Homebrewer’s Affiliation
Except you’re utilizing the brew in a bag method, a mash tun is a necessary piece of kit when advancing to all-grain brewing. Mash tuns are available in all shapes, sizes and supplies, and the best vessel for you’ll rely in your present procedures and future objectives as a homebrewer. Mash tuns could be bought from a homebrew store, or simply made at residence with restricted talent and instruments.
On this tutorial, we’ll cowl how one can construct a mash tun for batch sparge brewing (~5 gallon batches), an approachable technique of all-grain brewing. For extra directions, comply with together with AHA Director Gary Glass partly three of the Introduction to All-Grain Video Collection, as he walks viewers by way of the steps to constructing this mash tun.
The way it Works
Merely put, a mash tun is a vessel for conducting the mashing course of, whereas permitting for simple lautering—the method of eradicating the liquid wort from grain solids.
This particular construct makes use of a chrome steel provide line because the filter to permit the liquid to maneuver to the boil kettle, whereas leaving the grains and as a lot sediment as potential behind within the mash tun. The availability line is ready so that there’s principally a cylindrical display screen of stainless-steel that’s nice sufficient to forestall most solids from being transferred, with out an excessive amount of fear of clogging.
Supplies
- 48 quart picnic cooler
- Rubber mini-keg bung
- (2) 1/4″ hose clamps
- 1/2″ hose clamp
- 3/8″ inline nylon valve
- 7/16″ vinyl tubing*
- 16″ stainless-steel provide line**
- Meals-grade sealer
- *Sufficient size to succeed in your boil kettle.
**Shorter or longer lengths ought to work nice.
Instruments
- Scissors, to chop tubing
- Screw driver, for tightening hose clamps
- Needle-nosed pliers, for getting ready the stainless-steel braid
- Paper towel or rag, to scrub up sealer
- Noticed, or different technique of slicing by way of stainless-steel provide line
Building
Placing collectively a mash tun out of an oblong picnic cooler is definitely fairly straightforward. Evaluate the next steps, collect the supplies and instruments, and also you’ll have your self a do-it-yourself mash tun very quickly.
- Take away the spigot from the picnic cooler. Sometimes it may be unscrewed by hand, however it’s possible you’ll want to make use of pliers or another instrument whether it is screwed on tight.
- Take away the plastic plug from the rubber mini-keg bung. You’ll not want this.
- From the within of the cooler, place the rubber mini-keg bung in the entire the place the spigot was.
- Elective: If the mini-keg bung shouldn’t be becoming cosy, food-grade sealer can be utilized to create a water-tight seal.
- Run 6″ of the vinyl tubing by way of the mini-keg bung in order that there are a number of inches hanging out of every facet of the cooler.
- Put together the stainless-steel braid:
- Reduce off each ends of the stainless-steel provide line with snips or a noticed.
- Take away the plastic tubing from the within of the stainless-steel braid.
- Utilizing needle-nosed pliers, clamp one finish of the availability line shut.
- Connect the ready stainless-steel braid to the tip of vinyl tubing on the within of the cooler utilizing the 1/2″ hose clamp.
- Connect the nylon valve to the tip of the tubing on the surface of the cooler utilizing a 1/4″ hose clamp.
- On the opposite finish of the nylon valve, connect a bit of tubing lengthy sufficient to succeed in your boil kettle (sometimes ~2-4 toes) utilizing a 1/4″ hose clamp.
by way of the AHA: Methods to Construct a Mash Tun
The whole lot All Grain!
Our useful resource publish on all grain is the supply for every thing all grain!

Get a Deal on Bulk Grain

Our AHA Offers Roundup:

A Deal on All Grain Kits
Adventures in Homebrewing reductions seasonal homebrew beer recipe kits by 20%. Picks embrace each all grain and extract choices.
20% Off Seasonal All Grain Kits | 20% Off Seasonal Extract Kits
Grain Storage!
Storage Choices:
Ensure that the parts you employ are suitable and rated on your meant software. Contact producer with questions on suitability or a selected software. All the time learn and comply with producer instructions. prime:ahamashtun tag:tpr
